
The ultimate goal of an air distribution system is to uniformly deliver conditioned air into a room. A good diffuser setup mixes the air in the room while maintaining comfort for as many people as possible. An ineffective setup can cause drafty air, dead zones without proper mixing, or excessive noise. While most engineers understand the basics of how to select and place diffusers, we often see mistakes that could be avoided with a better understanding of air diffuser design.
Selection Criteria
To select diffusers for a room, an engineer first calculates the required cooling or heating load from the local environment, construction, and ventilation requirements defined by ASHRAE 62.1. This standard defines the ventilation load, which is usually 3 times less than the cooling/heating load in a perimeter zone and 2 times less in an interior space. They then select the diffuser and the quantity needed to supply the cooling/heating load while maintaining a room noise level below 35 NC. Typically, they select diffusers that are specced below 25 NC and multiply the number until they reach the required cfm load.
However, the actual noise level in a real scenario will be closer to 40 NC than 35 due to other factors such as inlet effects, room absorption, and environmental noise. Additionally, this selection often leads to too many diffusers for the room, resulting in drafts where airstreams collide and drop, especially with small package units with constant volume systems. In the below example we have a 20’ x 30’ room with a cooling load requirement of 1 cfm/ft2. Using the Nailor 24” x 24” UNI2 performance data, this is what the throw patterns would look like:
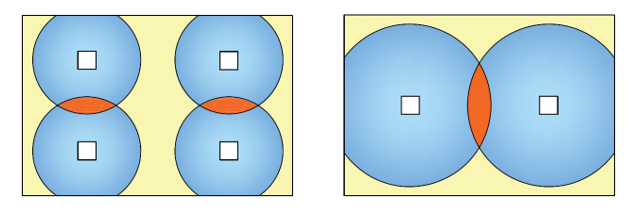
The configuration on the left, while slightly quieter, would have more collision zones (shown in orange) as well as less overall coverage. The configuration on the right gives more coverage for less cost. Additionally, most modern-day requirements are even lower than 1 cfm/ ft2, so just one diffuser would likely cover this entire space, resulting in no collision zones.
Occupancy Comfort
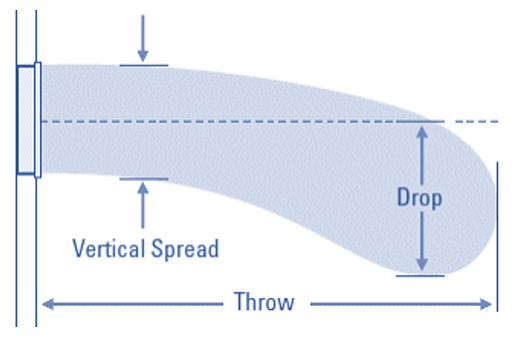
Each diffuser distributes a jet of air into the room with a specific velocity and pattern. Additionally, this jet accumulates more air from the room as it travels. "Throw" is the distance that the jet travels before slowing down to a certain velocity. Usually, these velocities are 150, 100, and 50 feet per minute (fpm). "Drop" is defined as the vertical distance that the jet falls by the end of its throw.
If the air jet enters into the room under the most basic constraints, it would look something like this:
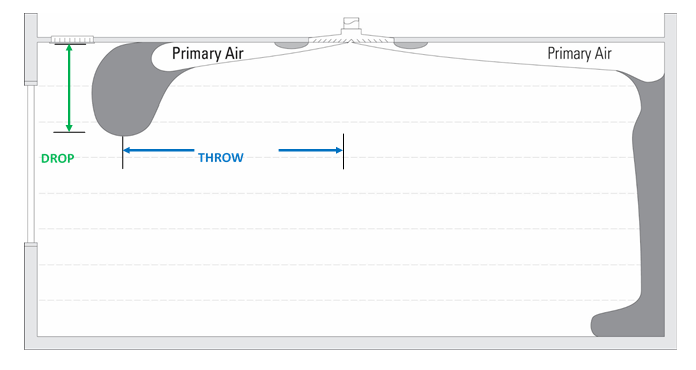
However, we also have to consider how the jet will change when it comes into contact with ceilings or walls. A jet that's flowing parallel to the ceiling will "stick" to it due to the low-pressure zone between the ceiling and the jet, letting it flow further and drop less. This phenomenon is called the Coanda effect. Because most manufacturers’ catalogued throw is based on throw along a surface, you should reduce expected throw by 30% if your diffuser is mounted more than 2 feet from the ceiling.
Throw is tested in isothermal conditions, meaning that the supply air is the same temperature as the room air. Of course, the supply air distributed in an actual room would be colder or warmer than the room air. A good rule of thumb is to adjust horizontal throw at 75 fpm by 1% for every degree Fahrenheit difference between the room and supply air. Decrease throw for cooled air and increase for heated. For vertical throw adjustments, do the reverse.
When colliding with a wall or a jet from a different diffuser, the jet will fall downwards:
The distance it falls is equal to the remaining distance it would've traveled without the wall. Occupants will feel drafty if jet collisions above 50 fpm enter the "occupied zone", defined as the space up to 6' from the floor and more than 2' away from walls. By properly spacing your diffusers, this can be avoided. A more in-depth explanation of occupancy comfort and ASHRAE's ADPI can be read here.
Noise
Besides room load and throw, engineers also consider noise, measured by NC, when selecting diffusers. NC is taken by first obtaining the octave band data through a test and subtracting 10dB from each octave band for room effect. After plotting this data, the NC is determined by the highest NC curve the band reaches.

In this case, the NC value would be 41 as that is the highest band the plotted spectrum reaches.
Accurately predicting the final NC of a room can be difficult since NC depends on many factors outside of the diffuser. There are a few things to consider to get a better estimate. First, ASHRAE 70 requires that diffusers be tested with several diameters of straight duct length leading to the diffuser. Since this requirement is rarely fulfilled in actual installations, 3 NC should be added to account for the duct noise. Second, 2 NC should be added from the increased noise when directly under the diffuser. Thus, we get a total of 5 NC added to your room's estimate, above what is cataloged by manufacturers. To calculate noise from multiple diffusers, just add 3 NC every time the number of diffusers is doubled. For example, with four NC25 diffusers within hearing distance you would add 6 NC because
4 = 1 X 2 X 2.
One rule of thumb to keep noise low is to keep your neck velocity below 1000 fpm. With this in mind, you can narrow down your diffuser selection.
Understanding air distribution design is essential in making the right decisions around diffuser selection and room design. Feel free to reach out to Nailor if you have any questions or are looking for more resources for gaining a deeper understanding.